< 목차 >
0. 프로젝트 진행 상황 및 내일 해야 할 일
1. 첫 번째 문제
2. 두 번째 문제
3. 오늘의 성과물
4. 성과물 코드
오늘은 기대하던 팀 프로젝트 첫날이다!
어제 늦게 22시 넘게까지 기능별로 업무 분담한 것을 토대로 각자 맡은 기능을 구현해보는 작업을 하였다. 내가 맡은 것은 어려워 보이던 TIL과 TO DO LIST 기입란이다. 흠.. 근데 하다 보니 사실 그 앨범 카드 부분이 더 어려웠으려나? 싶다.

0. 프로젝트 진행 상황 및 내일 해야 할 일
TIL과 TO DO LIST를 함께 작성할 수 있도록 먼저 만든 뒤, TO DO LIST 시작을 기점으로 잘라서 오른쪽에 배치하였다. div 값을 줘서 아예 영역을 나눠버리면 카드 종류가 2개가 돼서 통일성이 없어가지고 별로 안 예쁠 듯하여 합쳤다. 이미지 안 뜨고 값만 적혀있는 카드는 테스트용으로 만든 것이라서 그렇다. 카드는 다른 팀원이 만들어서 일단 그대로 두었고, 파이어베이스에 잘 들어가는지 정도만 일단 체크하였다.
내일은 카드 디자인을 기입하는 양식에 맞게 수정해야 하며 Firebase에 연동 잘 되고 있는지 중간중간 체크도 잊지 않고 해야 한다. 그리고 다른 팀원은 Header와 Main을 맡아서 코드 받은 것을 토대로 한 번 내 코드와 합쳐볼 생각이다. 그러면서 GitHub Pull, Push 어떻게 해야 할지 생각해야 할 듯하다.
오늘 직접 구현해 보며 정말 재밌었고 시간 가는 줄 몰랐다. 중간중간 계속해서 코드 적용이 안 되는 경우가 발생했지만 그것조차도 재밌었다.
문제 상황이 은근 있어서 계속 구글링하며 검색하고 그래도 모르겠으면 튜터님들께 찾아가서 조언을 구했다.

1. 첫 번째 문제
TO DO LIST <수직 중간 정렬> 하고 싶음 + '기록하기'와 '닫기' 버튼 을 밑으로 내리는 것이 안 됐다.
어떡하지.. 계속 고민하다가 div로 TIL과 TO DO LIST를 합친 영역과 버튼 영역을 나눠서 버튼을 밑으로 보내면 되겠다는 아이디어가 떠올랐다. 관련 내용 구글링 해서 아래처럼 작성했더니 되었다 힛
#btndown {
            display: flex;
            flex-direction: column;
            justify-content: space-between;
        }
2. 두 번째 문제
TIL과 TO DO LIST 중간이 계속 붙음. justify-content
이전에 어렵사리 띄웠는데, 기록하기와 닫기 버튼을 내리니 다시 붙음..
justify-content: space-between;
이걸 했는데도 딱 붙어있어서 '대체 뭐가 문젠데' 하면서 계속 고민하다가 '설마.. 전에 썼던 코드처럼 비슷하게 하면 되지 않을까?' 싶던 와중에 팀원 한 분이 도와주셔서 해결되었다.
▼ 전에 썼던 코드! 원리가 비슷하다.
.mybtn>button {
            margin-right: 5px;
        }
▼ 원하는 대로 구현된 코드! 'TIL 작성하기'를 div로 묶고 id로 지정한 뒤, margin-right 사용했다!
.TIL {
            margin-right: 15px;
        }
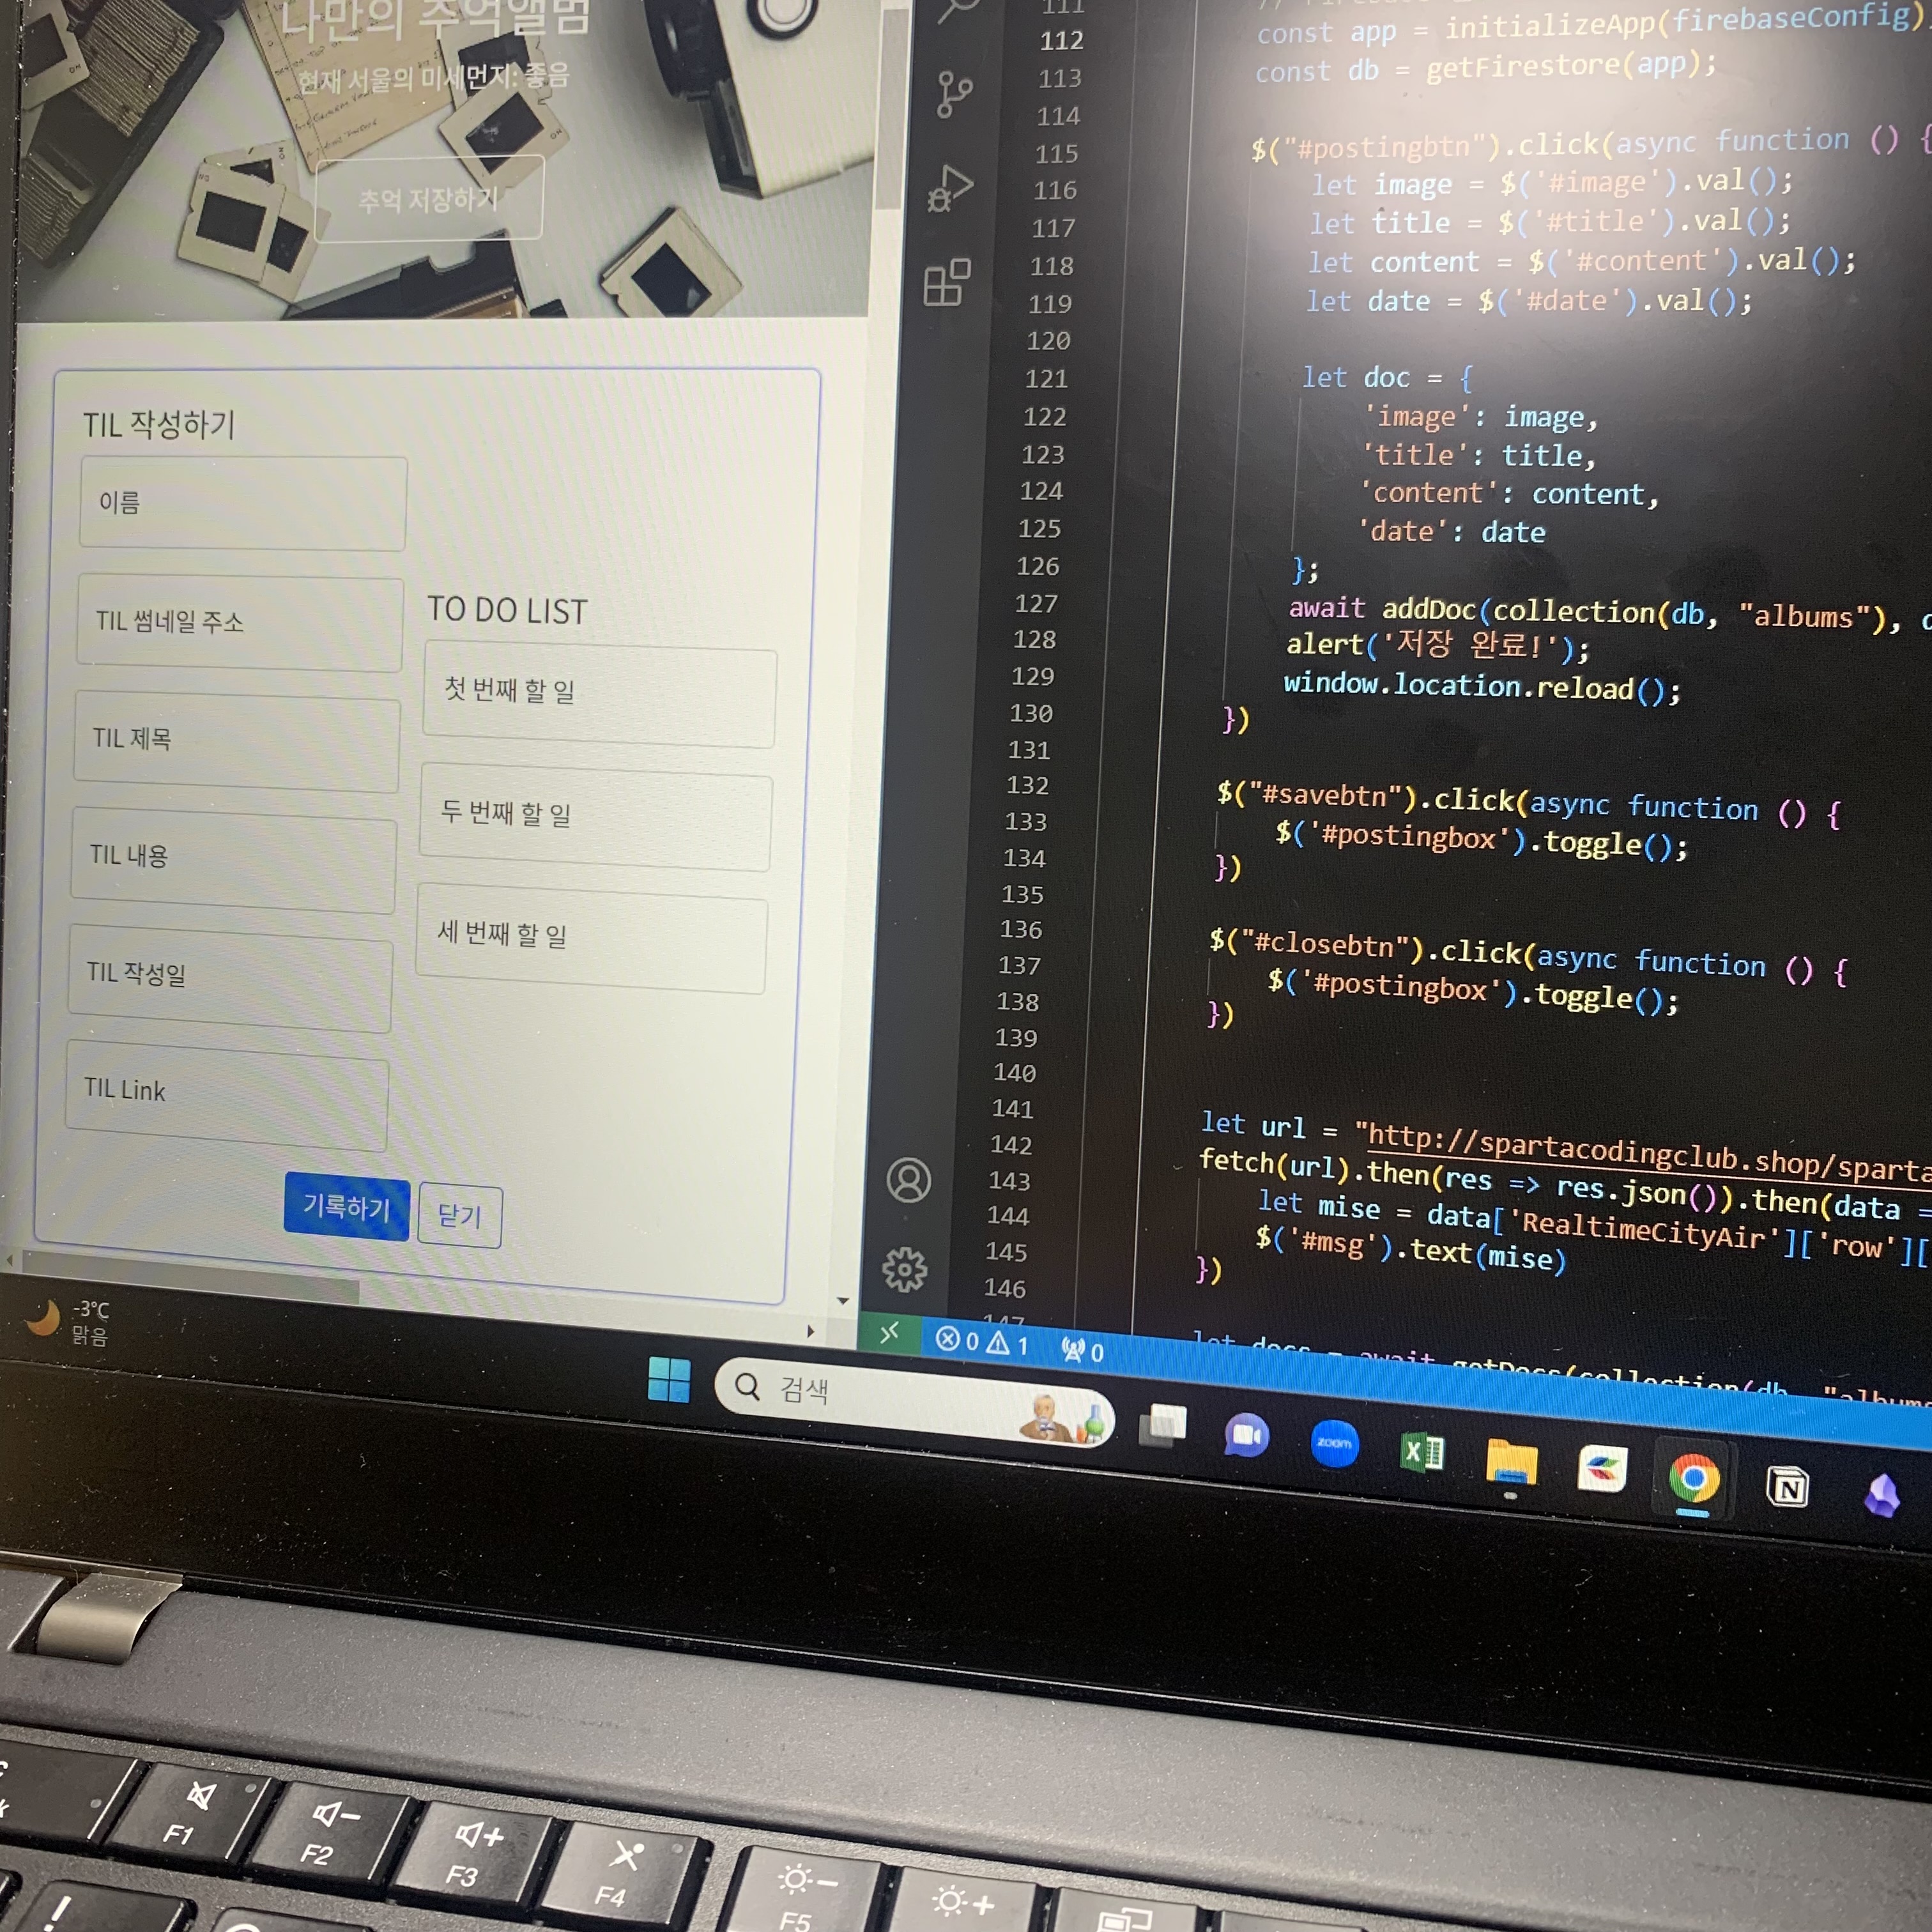
3. 오늘의 성과물
결과물은~ 요래 됐심당~!
넘 귀엽쥬? 아기자기 하쥬? 이거 왼쪽에 main에 있는 다른 내용을 수정할 수 있는 기입란도 추가할 거라서 일단 이렇게 해두었고, 내일이나 추가 후에 가로 간격을 좀 더 늘려서 기입란이 조금 더 보이게 수정할까 한다. 좀 좁은 듯! 암튼 그래도 저 정도면 나름 맘에 든다. 더 발전해야지! 그리고 볼드체로도 CSS 해보고 싶어서 오늘 좀 알아보았다. 적용도 해봐야징 히히 재밌겠다
오늘은 1 on 1으로 개인 상담도 30분 가량 진행되었다! 튜터님이 정말 너무 내게 꼭 맞는 정보와 말씀을 해주셔서 진심으로 깊이 감사했다 ㅠㅠ 감동..... 제 열정으로 보답하겠습니다!!!!!!!!!!!! 이걸 쓰고 있는 지금도 계속 팀 프로젝트 하다가 22시 10분에 작성 중이다..
아 그리고 문제 있었던 부분은 그때그때 캡처해서 남겨두어야겠다. 사실 오늘 문제 있었던 것이 좀 더 있었는데 캡처 남겨둔 게 저것 뿐이라 저것만 작성하였다. 낼부턴 그때그때 캡처해서 남겨두어야지.
<!DOCTYPE html>
<html lang="en">

<head>
    <meta charset="UTF-8">
    <meta http-equiv="X-UA-Compatible" content="IE=edge">
    <meta name="viewport" content="width=device-width, initial-scale=1.0">
    <title>나만의 추억앨범</title>
    <script src="https://ajax.googleapis.com/ajax/libs/jquery/3.5.1/jquery.min.js"></script>
    <link href="https://cdn.jsdelivr.net/npm/bootstrap@5.0.2/dist/css/bootstrap.min.css" rel="stylesheet"
        integrity="sha384-EVSTQN3/azprG1Anm3QDgpJLIm9Nao0Yz1ztcQTwFspd3yD65VohhpuuCOmLASjC" crossorigin="anonymous">

    <style>
        @import url('https://fonts.googleapis.com/css2?family=Noto+Sans+KR&display=swap');

        * {
            font-family: 'Noto Sans KR', sans-serif;
        }

        .mytitle {
            height: 250px;
            color: white;

            display: flex;
            flex-direction: column;
            align-items: center;
            justify-content: center;

            background-image: url('https://images.unsplash.com/photo-1511992243105-2992b3fd0410?ixlib=rb-4.0.3&ixid=M3wxMjA3fDB8MHxwaG90by1wYWdlfHx8fGVufDB8fHx8fA%3D%3D&auto=format&fit=crop&w=1470&q=80');
            background-position: center;
            background-size: cover;
        }

        .mytitle>button {
            width: 150px;
            height: 50px;
            background-color: transparent;
            color: white;
            border: 1px solid white;
            border-radius: 5px;

            margin-top: 20px;
        }

        .mycards {
            width: 1200px;
            margin: 30px auto 0px auto;
        }

        .mypostingbox {
            width: 500px;
            margin: 30px auto 0px auto;
            padding: 20px;
            box-shadow: 0px 0px 3px 0px blue;
            border-radius: 5px;
        }

        .mybtn {
            display: flex;
            flex-direction: row;
            align-items: center;
            justify-content: center;
        }

        .mybtn>button {
            margin-right: 5px;
        }

        .TIL {
            margin-right: 15px;
        }

        #postingbox {
            display: flex;
            flex-flow: row nowrap;
            justify-content: space-between;
        }

        #TILandTodolist {
            display: flex;
            align-items: center;
        }

        #btndown {
            display: flex;
            flex-direction: column;
            justify-content: space-between;
        }
    </style>

    <script type="module">
        // Firebase SDK 라이브러리 가져오기
        import { initializeApp } from "https://www.gstatic.com/firebasejs/9.22.0/firebase-app.js";
        import { getFirestore } from "https://www.gstatic.com/firebasejs/9.22.0/firebase-firestore.js";
        import { collection, addDoc } from "https://www.gstatic.com/firebasejs/9.22.0/firebase-firestore.js";
        import { getDocs } from "https://www.gstatic.com/firebasejs/9.22.0/firebase-firestore.js";


        // For Firebase JS SDK v7.20.0 and later, measurementId is optional
        const firebaseConfig = {
            apiKey: "AIzaSyCxm2PRatT74kfbbbJR8UtAiH9UsXmXjSA",
            authDomain: "sparta-6c84b.firebaseapp.com",
            projectId: "sparta-6c84b",
            storageBucket: "sparta-6c84b.appspot.com",
            messagingSenderId: "178568338973",
            appId: "1:178568338973:web:8d3fe5554d88b37044f0f4",
            measurementId: "G-GELDSRVD49"
        };


        // Firebase 인스턴스 초기화
        const app = initializeApp(firebaseConfig);
        const db = getFirestore(app);

        $("#postingbtn").click(async function () {
            let image = $('#image').val();
            let title = $('#title').val();
            let content = $('#content').val();
            let date = $('#date').val();

            let doc = {
                'image': image,
                'title': title,
                'content': content,
                'date': date
            };
            await addDoc(collection(db, "albums"), doc);
            alert('저장 완료!');
            window.location.reload();
        })

        $("#savebtn").click(async function () {
            $('#postingbox').toggle();
        })

        $("#closebtn").click(async function () {
            $('#postingbox').toggle();
        })


        let url = "http://spartacodingclub.shop/sparta_api/seoulair";
        fetch(url).then(res => res.json()).then(data => {
            let mise = data['RealtimeCityAir']['row'][0]['IDEX_NM']
            $('#msg').text(mise)
        })

        let docs = await getDocs(collection(db, "albums"));
        docs.forEach((doc) => {
            let row = doc.data();
            let image = row['image'];
            let title = row['title'];
            let content = row['content'];
            let date = row['date'];

            let temp_html = `
             <div class="col">
                <div class="card h-100">
                    <img src="${image}"
                        class="card-img-top" alt="...">
                    <div class="card-body">
                        <h5 class="card-title">${title}</h5>
                        <p class="card-text">${content}</p>
                    </div>
                    <div class="card-footer">
                        <small class="text-body-secondary">${date}</small>
                    </div>
                </div>
            </div>`;
            $('#card').append(temp_html);
        });
    </script>
</head>

<body>
    <div class="mytitle">
        <h1>나만의 추억앨범</h1>
        <p>현재 서울의 미세먼지: <span id="msg">나쁨</span></p>
        <button id="savebtn">추억 저장하기</button>
    </div>

    <div class="mypostingbox" id="postingbox">
        <div class="btndown" id="btndown">
            <div class="TILandTodolist" id="TILandTodolist">
                <div class="TIL">
                    <h5>TIL 작성하기</h5>
                    <div class="form-floating mb-3">
                        <input type="email" class="form-control" id="image" placeholder="이름">
                        <label for="floatingInput">이름</label>
                    </div>
                    <div class="form-floating mb-3">
                        <input type="email" class="form-control" id="title" placeholder="TIL 썸네일 주소">
                        <label for="floatingInput">TIL 썸네일 주소</label>
                    </div>
                    <div class="form-floating mb-3">
                        <input type="email" class="form-control" id="content" placeholder="TIL 제목">
                        <label for="floatingInput">TIL 제목</label>
                    </div>
                    <div class="form-floating mb-3">
                        <input type="email" class="form-control" id="date" placeholder="TIL 내용">
                        <label for="floatingInput">TIL 내용</label>
                    </div>
                    <div class="form-floating mb-3">
                        <input type="email" class="form-control" id="image" placeholder="TIL 작성일">
                        <label for="floatingInput">TIL 작성일</label>
                    </div>
                    <div class="form-floating mb-3">
                        <input type="email" class="form-control" id="image" placeholder="TIL Link">
                        <label for="floatingInput">TIL Link</label>
                    </div>
                </div>
                <div class="Todolist">
                    <h5>TO DO LIST</h5>
                    <div class="form-floating mb-3">
                        <input type="email" class="form-control" id="image" placeholder="첫 번째 할 일">
                        <label for="floatingInput">첫 번째 할 일</label>
                    </div>
                    <div class="form-floating mb-3">
                        <input type="email" class="form-control" id="image" placeholder="두 번째 할 일">
                        <label for="floatingInput">두 번째 할 일</label>
                    </div>
                    <div class="form-floating mb-3">
                        <input type="email" class="form-control" id="image" placeholder="세 번째 할 일">
                        <label for="floatingInput">세 번째 할 일</label>
                    </div>
                </div>
            </div>
            <div class="mybtn">
                <button id="postingbtn" type="button" class="btn btn-primary">기록하기</button>
                <button type="button" class="btn btn-outline-primary" id="closebtn">닫기</button>
            </div>
        </div>
    </div>

    <div class="mycards">
        <div id="card" class="row row-cols-1 row-cols-md-4 g-4">
        </div>
    </div>
</body>

</html>
4. 성과물 코드
저의 사랑스러운 코드예용 꺄하항 넘나 뿌듯
내일 오전까지는 무조건 Firebase랑 앨범 카드 강의 내용 다시 청강해서 팀원분들 코드도 좀 수정해보고 하고 싶다! 헿
'[Front-end] 개발자 공부' 카테고리의 다른 글
| [개발 공부 6일차] 팀 프로젝트 마무리! 및 JS 문법 시작 (1) | 2023.12.29 |
|---|---|
| [개발 공부 5일차] 팀 프로젝트 2일차! (1) | 2023.12.29 |
| [개발 공부 3일차] Git과 GitHub 기초 (0) | 2023.12.26 |
| [개발 공부 2일차] jQuery & Fetch & 서버 개념 (4) | 2023.12.22 |
| [개발 공부 1일차] Git과 HTML & CSS & JAVASCRIPT의 기초 (2) | 2023.12.21 |